Photo slideshows are a traditional means of preserving memories, and yet when it comes to photographs alone, they may be less personal or even dull. And because of CapCut Desktop, you are also in the position to turn those slideshows into entertaining videos, with AI-generated voiceovers. No mic required.
AI Voice Generator by CapCut allows you to talk through your slideshows without uttering even a word. Creating a family montage, a business presentation, or a social media post, CapCut turns still images into moving and engaging visual narratives, which are persuasive in and of themselves.
Why Upgrade Your Slideshows?
A slideshow is an excellent storytelling medium; however, adding transitions and audio brings the experience to the next level. Through CapCut Desktop, you will be able to:
• Add narration with AI-generated voices
• Animate photo transitions
• Enhance image quality
• Sync visuals and audio for better storytelling
Better still, the AI Voice Generator in CapCut simplifies the process and makes it easy and quick for anyone without any editing or recording skills.
Key CapCut Features That Make This Easy
1. Text to Speech
Text-to-speech in CapCut will enable you to change written scripts to life-like AI voiceovers in no time. With many languages, tones, and types of voices to choose from, you can make your video fabulous without using a microphone or recording.
2. Image Animation Tools
With animation effects, CapCut helps bring your still photos to life. Use zoom, slide, or fade transitions in every image, making your slideshow feel smooth and movie-like.
3. Enhance Image
Click on the Enhance image and immediately increase the clarity, brightness, and contrast of the photo. It is a single-click tool to make the visuals you use sharp and professional-looking.
4. Audio Customization
Use the many audio options to modify the AI voiceover easily. Add trim clips, control volume, and fade-in/fade-out effects to blend the audio into a smooth flow.
5. One-Click Export
One click is all it takes to export your video to the highest resolutions, including 4K. Select format, resolution, and file name – CapCut does the rest faster and with high efficiency.
How to Turn Slideshows into Narrated Videos in CapCut
Step 1: Import Your Photos
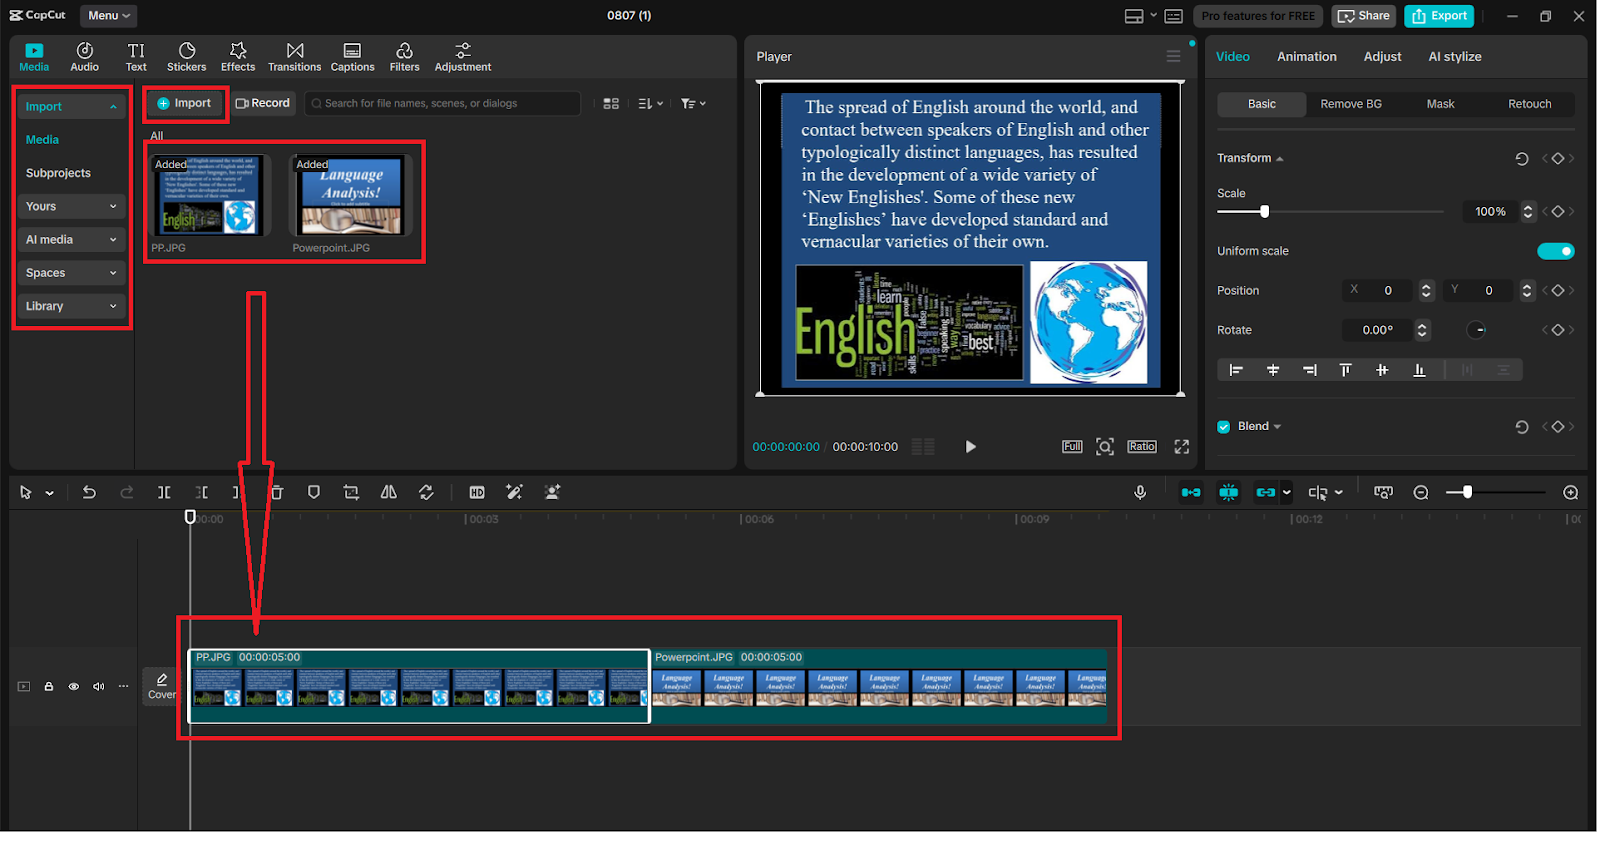
Launch CapCut Desktop and select “New project”. Insert your pictures in the “Media” section with the use of the “Import” button or by dragging and dropping. Next, simply drag the pictures onto your timeline in the sequence you like.
CapCut has a default time of its own on each picture, which you can adjust according to your requirements for the voiceover script.
Step 2: Animate Photos with Motion Effects
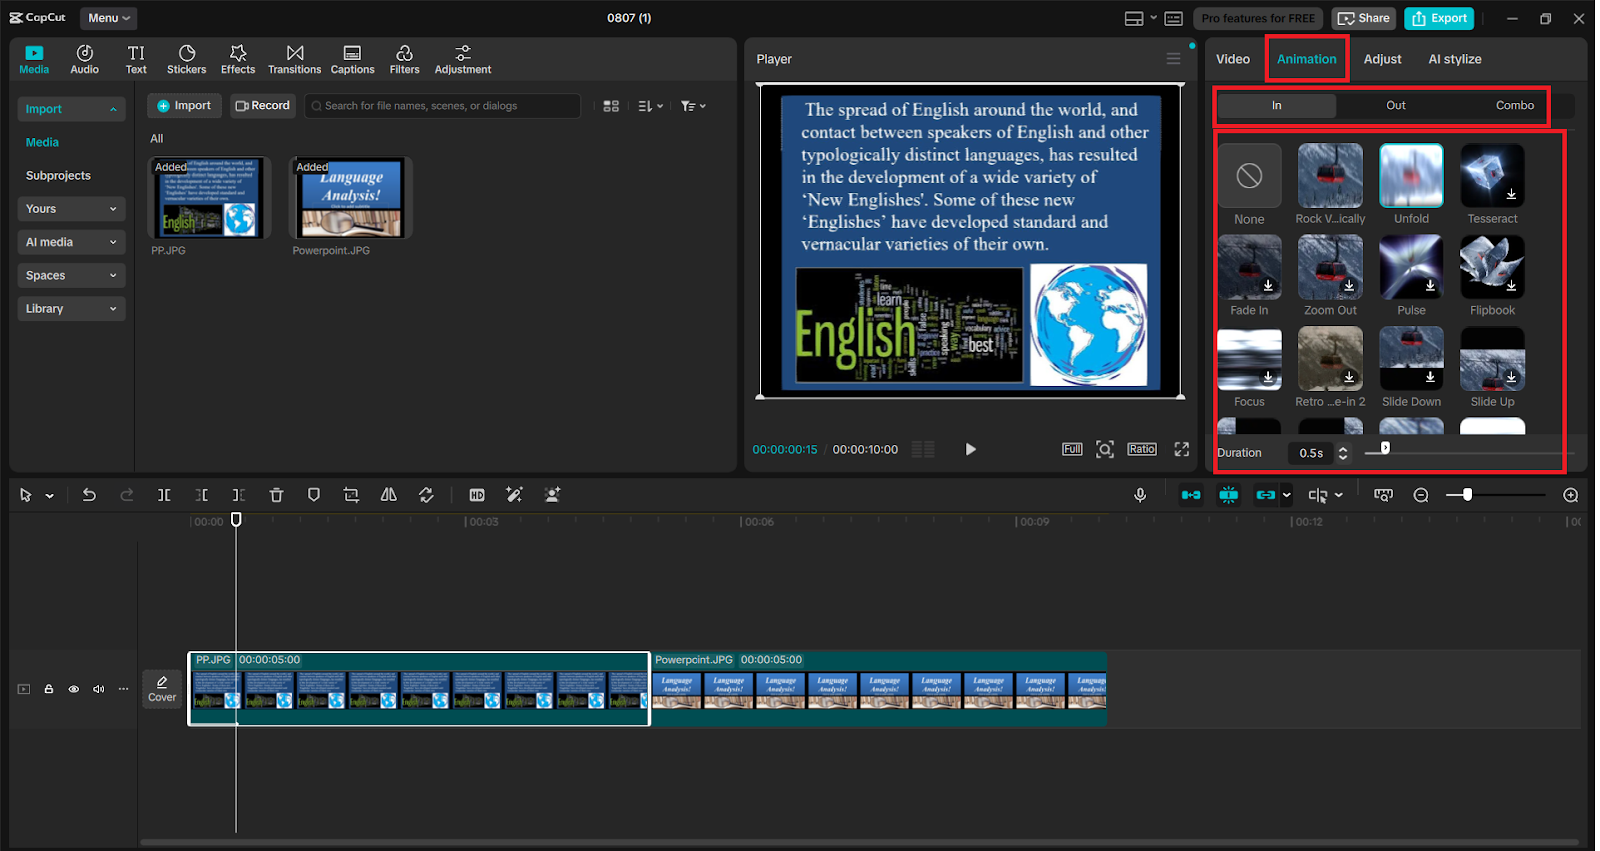
Individually select each of the pictures on the timeline and choose the “Animation” button in the upper toolbar. Select an animation type: “In”, “Out”, or “Combo” to use animation (e.g., zooming in, sliding left). This provides your slideshow with a film finesse.
Play with the photos on the playback icon to make sure transitions are smooth after you have animated all the photos.
Step 3: Add Voiceover with Text to Speech
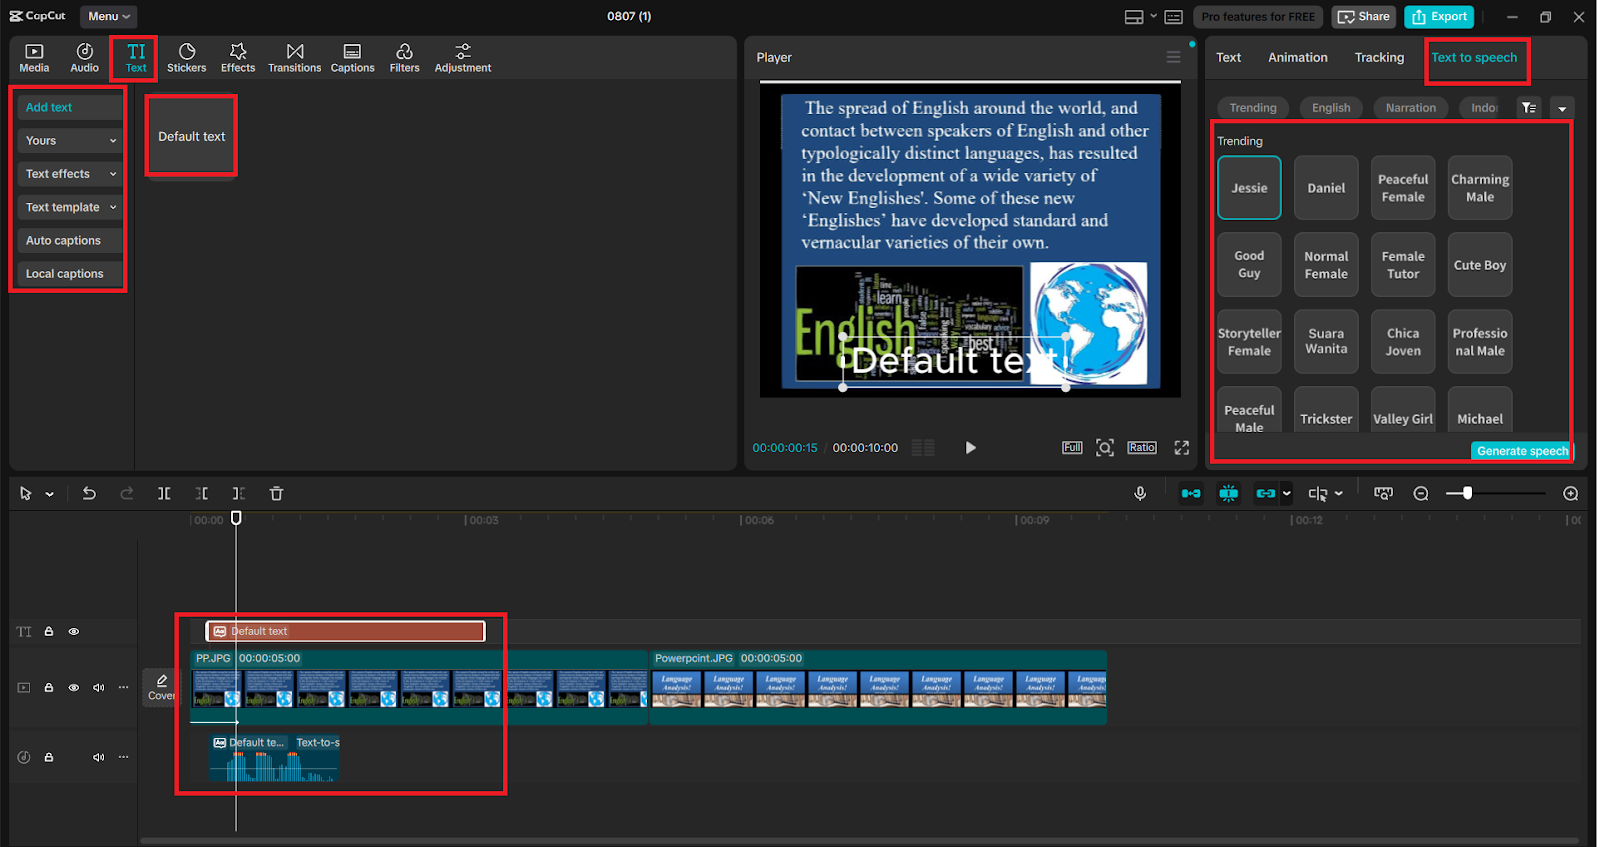
To create a voice-over to the slideshow, go to the “Text” tab, and toggle “Text to speech”. In the box appearing, enter your script. Select a language, tone, and gender of the voice and touch “Generate speech”.
The voiceover will be produced and then will exist on your timeline as an audio track. Place it in a place where you would like the narration to start.
With this Text to Speech AI technology, you can easily insert the professional voice-over without a microphone, a great choice when working remotely or on a tight production schedule.
Step 4: Sync and Polish Your Video
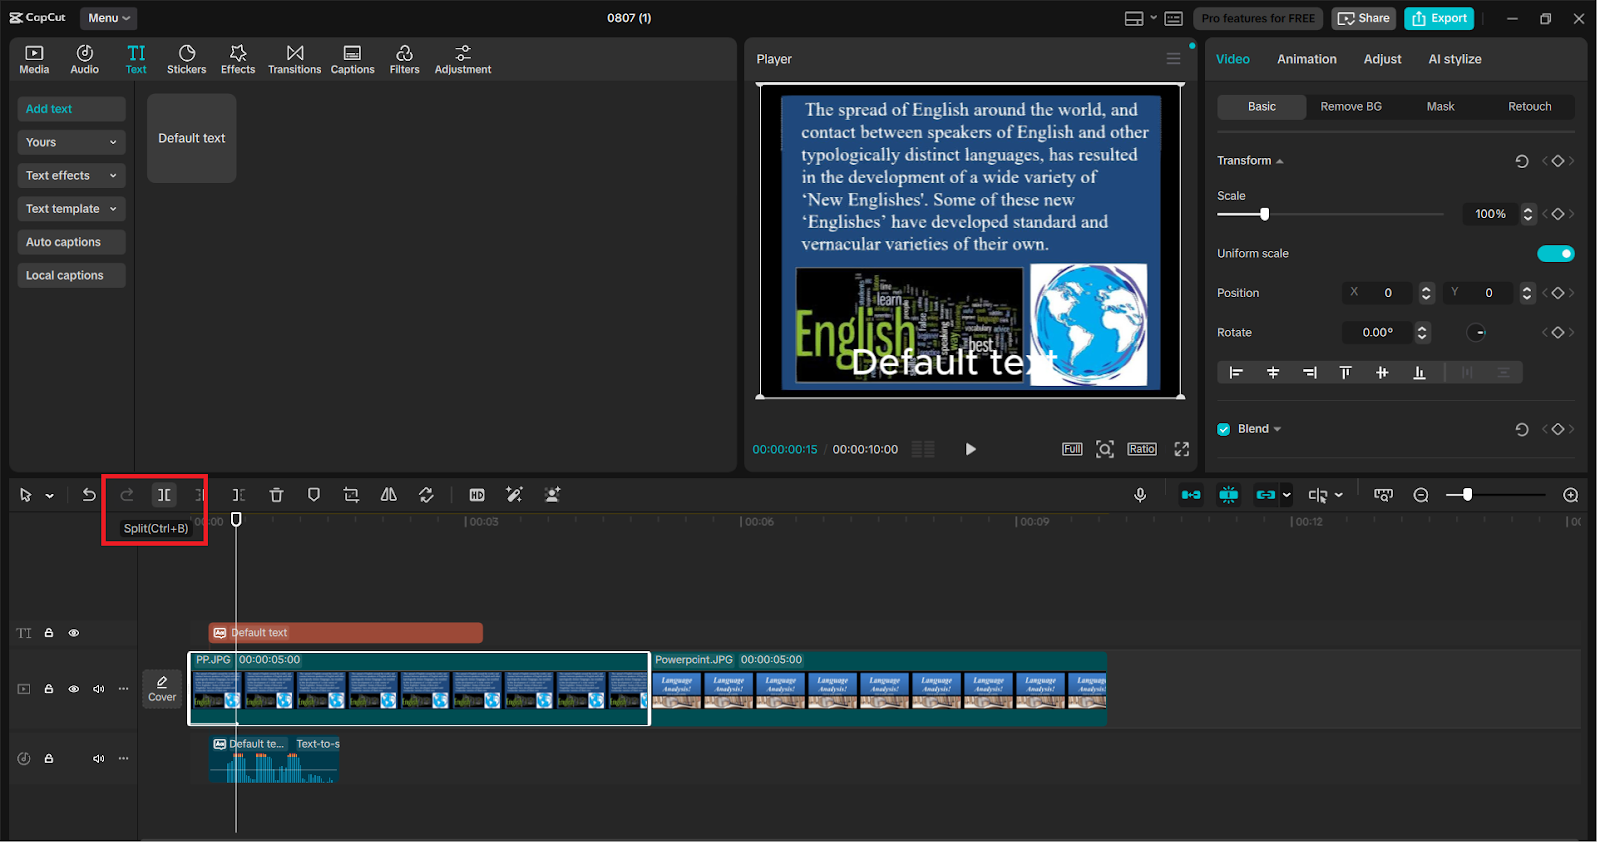
Move your voiceover audio to go in sync with the photos. Open the “Split” tool and readjust the length of each of the photos according to the narration. Increase or decrease the setting or add fade-in/out in the audio settings panel.
Then improve your pictures by simply clicking on a picture and hitting the words “Enhance quality” on the top toolbar. CapCut automatically sharpens, brightens, and balances your photos to come up with a finished video result.
Step 5: Export and Enhance with an AI Video Upscaler
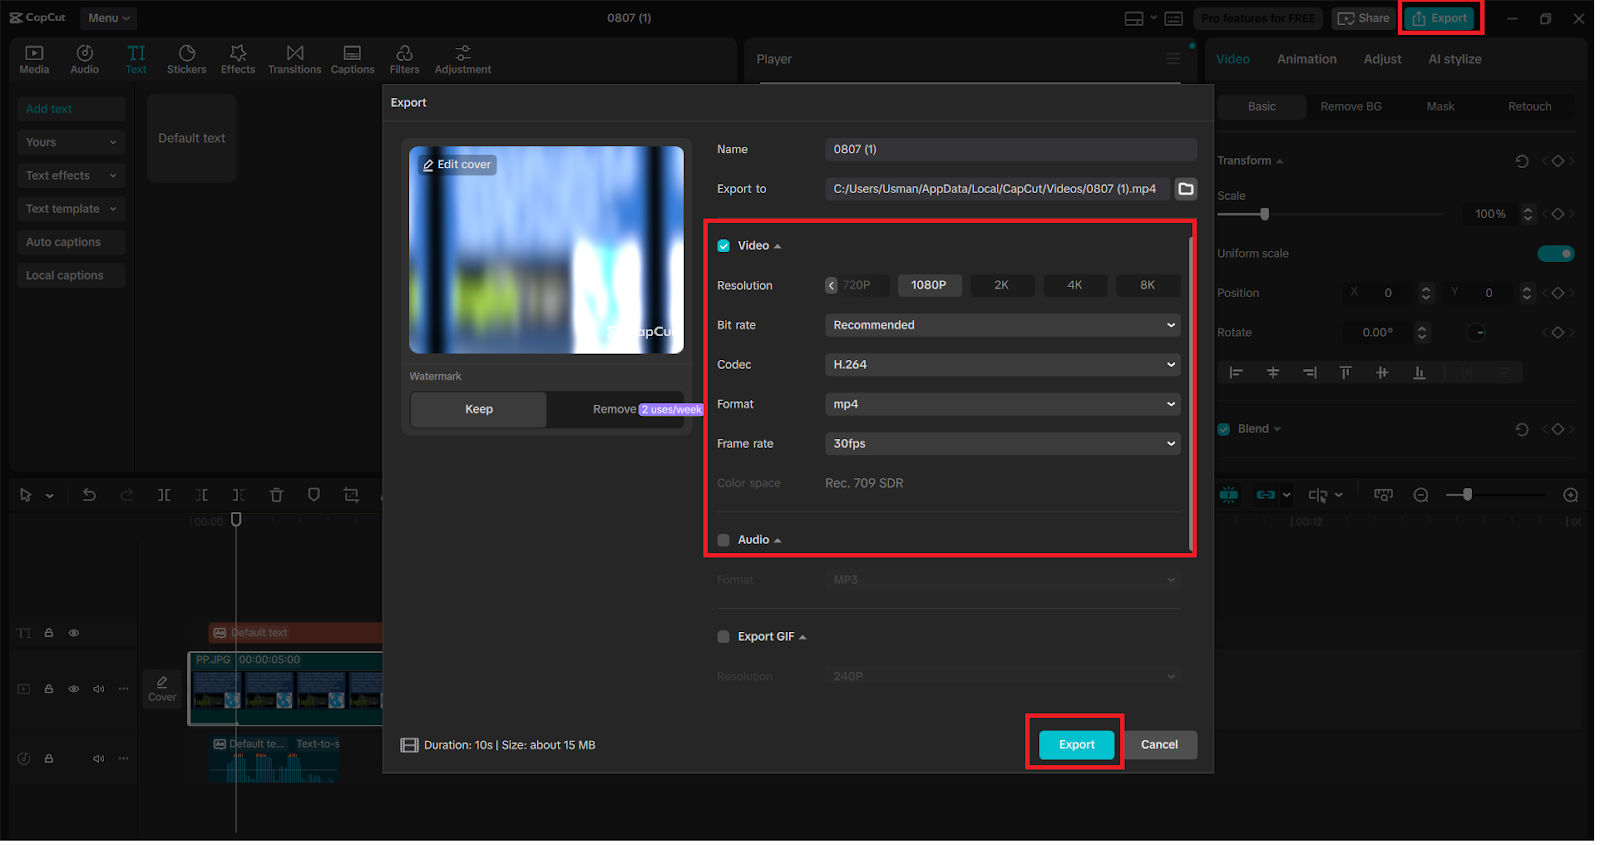
When your slideshow video has the visual and audio effect you want, click the button at the bottom labeled “Export”. Select your resolution (up to 4K), frame rate, and file format.
Feeling like taking your video up a notch? The resolution can be increased by applying an external AI Video Upscaler, so it is ideal to be used in large displays, professional environments, or having it uploaded on YouTube and Instagram in high resolution.
Final Thoughts
CapCut desktop can bring a new life to photo slideshows perfectly with no special editing knowledge, fancy microphones, or recording studios. Even still photos can be used as the basis of a vivid narrated story with smart features that include text to speech AI, image enhancement, and easy-to-use editing on a story timeline.
Therefore, why post a silent photo reel and post videos instead that have a thing to say? CapCut AI Voice Generator does the talking-and you see your memories immortalized.

